Smart PC Control Alexa + Remote Access
Ever wished you could turn on your PC with just your voice? I made Alexa do it—and set up secure remote access with RustDesk. Here’s how I pulled it off!

Damn it! I got that file in my pc at home
You ever left home, halfway to wherever you’re going, and suddenly remembered you needed something from your computer? That was me. The worst part? My PC was off.
Well this is actually a situation fairly often for me and I needed a way to turn it on remotely, access it securely and also be able to share files, no matter where I was. That’s when I went down the rabbit hole of Wake-on-LAN, RustDesk, and self-hosted setups—with some inspiration of course.
If you just want to make it and not too invested in the process or understading it here’s an awesome video I found in under 2 minutes of how to set it up How to Turn On Your PC with Amazon Alexa (Tutorial) - YouTube
So I recently came across a video of NetworkChuck talking about how his team uses RustDesk to get remote access to the machines that are at the office, at first, I thought “well, this should be fairly easy with the most known apps such as AnyDesk, TeamViewer, etc”, and he then went on explaining why most commercial solutions weren’t a goot fit for his specific case.
To start, RustDesk is open source, and we love open source, second of it, it is self hosted meaning more secure, but we will talk about it later. And third, it just so easy to set up and have it running.
Now, the other part and actually the most interesting one (in my case) was the enigma of how can I turn on my pc remotely even if I’m at the college or the office. Until that point I didn’t know this magical thing called Wake-on-LAN, and to get a little bit more of insight of what the hell this is, here is a quick overview:
Wake-on-LAN
Think of Wake-on-LAN (WOL) like a remote wake-up call for your PC. Normally, when your computer is off, it ignores all network activity. But with WOL enabled, it listens for a special “magic packet” sent from another device (like Alexa, your phone, or a laptop).
This magic packet is like a secret knock that tells your PC, “Hey, wake up!” It works using your PC’s MAC address (a unique network ID), which acts like its phone number on the network.
For this to work:
- Your computer must stay slightly awake, even when off (which is why WOL is enabled in the BIOS).
- Your network adapter listens only for the magic packet, preventing unnecessary wake-ups.
- The command must come from a device on the same network or be properly routed through the internet.
In my setup, Alexa sends this magic packet to my PC when I say, “Alexa, turn on Roberto” Once the computer wakes up, I can remotely access it from anywhere.
Rustdesk secure and self-hosted
I’m still working on this part (mostly because I’m setting up my homelab), but once it’s fully up and running, I’ll update this section with all the details.
For now, let’s talk about why self-hosting RustDesk is a game-changer. Unlike using RustDesk’s public servers, self-hosting gives you full control over your remote connections. That means:
- More Security – Your data stays in your own network, not passing through third-party servers.
- Better Speed – Since everything runs on your own server, there’s less delay compared to public relay servers.
- No Dependence on External Services – If RustDesk’s servers go down, your setup keeps working.
- Awesome Flexibility – You decide how it runs, tweak the settings, and even scale it to your needs.
The best part? RustDesk actually encourages this by giving users the option to self-host. Not every remote access tool does that, and it’s refreshing to see a project that values user control.
So yeah, self-hosting takes a bit of effort, but the payoff? A fast, private, and rock-solid remote access setup. Stay tuned for the full breakdown once my homelab is complete!
Step by step
Step 1: Making Alexa Turn On the PC
To pull this off, I used Wake-on-LAN via Alexa with a few extra tweaks. Here’s exactly how I got it working:
1. Enable Wake-on-LAN on Windows
Before anything, your motherboard needs to support Wake-on-LAN (WOL). Since BIOS settings vary by manufacturer, you first need to identify your motherboard model.
- I recommend using CPU-Z—a free tool that gives you all the details about your PC hardware.
- Once you have your motherboard name, search “Enable WOL on [Your Motherboard Model]” on YouTube or Google. There’s bound to be a tutorial for your specific setup.
After enabling WOL in the BIOS, you need to activate it in Windows:
- Open Device Manager
- Right-click the Windows icon on the taskbar and select Device Manager.
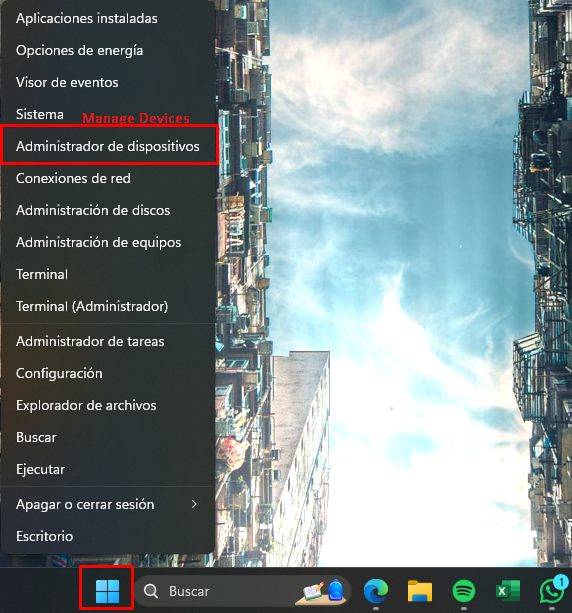
- Right-click the Windows icon on the taskbar and select Device Manager.
- Enable WOL in Network Adapter Settings
- Expand Network Adapters, find your active adapter, and right-click Properties.
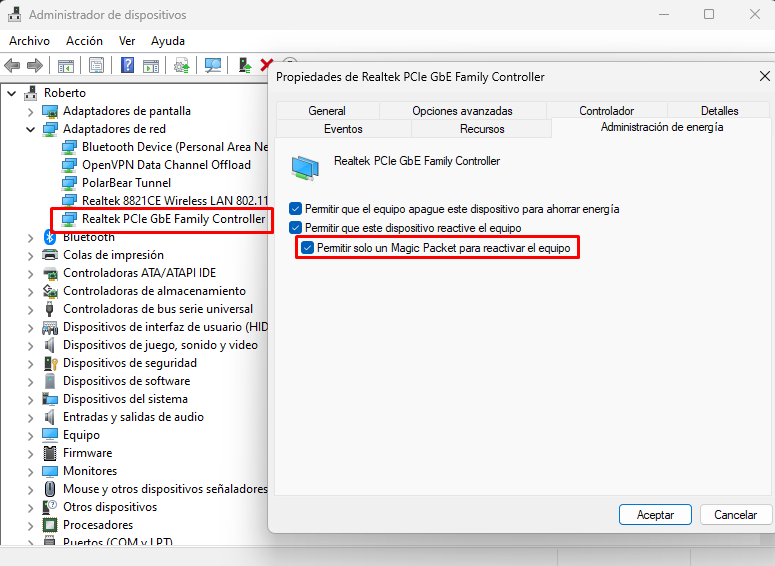
- Go to Power Management and enable all the options (especially the last one).
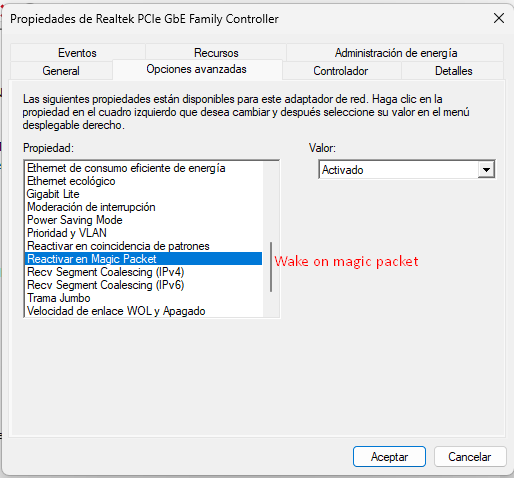
- Switch to the Advanced tab and ensure “Wake on Magic Packet” is enabled.
- Expand Network Adapters, find your active adapter, and right-click Properties.
2. Set Up a Wake-on-LAN Alexa Skill
To make Alexa send the magic packet, I used Wake on LAN Alexa Skill (but you can choose another one if you prefer).
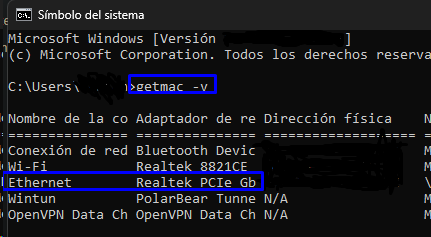
Find Your MAC Address
Before setting it up, you need your PC’s MAC address:
- Open Command Prompt (type
cmdin Windows Search).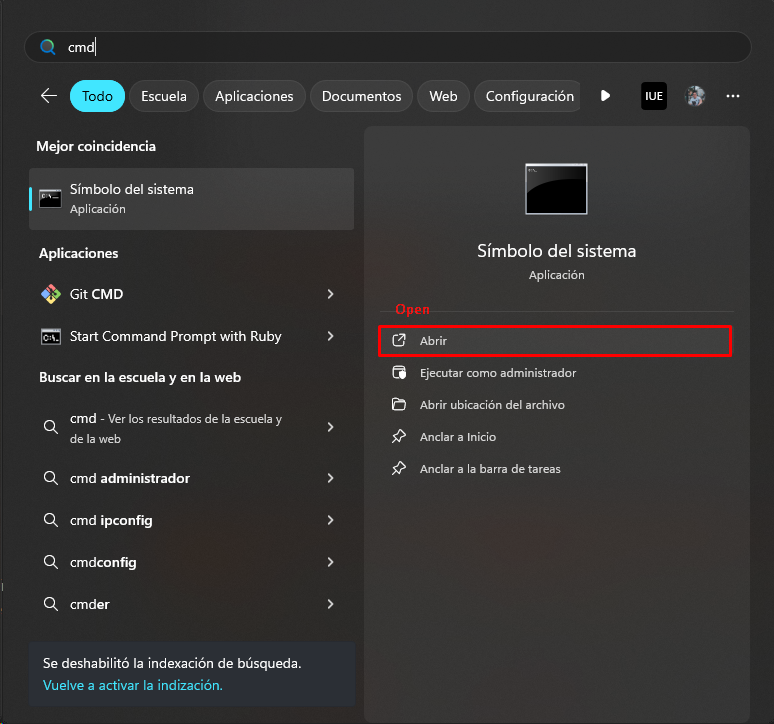
- Type:
getmac -v - Hit Enter and find the MAC address for the adapter you configured earlier. It should look like this: AA-11-BB-22-CC-33
Connect Alexa to Your PC
- Visit the Wake on LAN Alexa Skill page and link your Amazon account.
- Add a new device, enter your MAC address, and choose a custom name.

- Click on “Add” and you’re ready to go!
3. Test It
Here’s where things got me at first.
- Alexa just wouldn’t recognize the command at first. I triple-checked everything—still nothing.
- After doing these steps if I typed the commend on my phone it would work, but by voice it wouldn’t, it was late and decided to troubleshoot another day.
- The next day, I tried again, fully expecting it to fail… and it worked! No idea what changed, I guess you just have to wait some time for it to update.
Step 2: Remote Access with RustDesk (Self-Hosted, Of Course!)
With Alexa successfully waking up my PC, the next step was securing remote access so I could control it from anywhere. Since I run Linux on my laptop and my PC is on Windows, I needed a reliable cross-platform solution—and finding one that actually worked well was a challenge.
After testing a few options, I decided to self-host RustDesk, taking inspiration from NetworkChuck’s setup. Unlike using RustDesk’s public servers, self-hosting gives me full control over speed, security, and reliability. The plan is to:
- Run RustDesk on Docker inside my homelab.
- Configure my own relay and rendezvous servers to bypass third-party services.
As of now, I’m still setting up the RustDesk server in my homelab, but once it’s fully operational, I’ll update this post with a detailed breakdown of the process and any quirks I run into. Stay tuned!
var = 1
for i in j (
	var ++
)
Final Thoughts: What Did I Learn?
- Persistence pays off. Sometimes, tech just starts working for no reason.
- Self-hosting is worth it. RustDesk gives me control over my data and tweak everything.
- Wake-on-LAN + Alexa = Super handy.